I have gotten some questions regarding the fonts supplied with my UTFT library. I will try to answer most of them here.
To understand this how-to you should have a basic understanding of binary and hexadecimal numbers.
If you are stumped already you should either read up, use my online Font Maker UTFT, or consider leaving the fonts as they are.
As of v4.0 of the ITDB02_Graph libraries (the predecessors to UTFT) fonts can be of any size as long as the width is dividable by 8 (i.e. 8, 16, 24...). This restriction is simply to make things a bit easier, while not wasting precious memory.
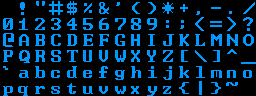
The libraries support font-tables with as many characters as you want (up to 255), but you should try to keep it within the following ASCII subset of 95 characters. These are what is generally knows as the ASCII printable characters. If you want to only use a subset of these characters you will need to keep them contiguous and in order. This means that you can use only the letters from 'A' to 'Z' as a subset, but you can not use 'A' to 'Z' and 'a' to 'z' without also including the characters between 'Z' and 'a'.
Please note that the online UTFT Font Maker only supports Full Fonts (95 characters) and Numeric Fonts (10 characters).
! " # $ % & ' ( ) * + , - . / 0 1 2 3 4 5 6 7 8 9 : ; < = > ?
@ A B C D E F G H I J K L M N O P Q R S T U V W X Y Z [ \ ] ^ _
` a b c d e f g h i j k l m n o p q r s t u v w x y z { | } ~
The small font was supplied with the demo-code from ITead Studio. I do not know how they made it.
The large font was originally made by manually calculating all 3040 bytes. This is what I will guide you through here. I will also show you how the small font could be made.
The first small steps...
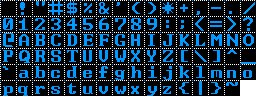
The first thing I did was to find a picture of a suitable font. You can make a picture yourself, or you can find one by seaching the Internet. I found mine through Google.
This is what I settled on:
When I had found my picture I made some guide-dots that would help me later.
If we zoom in a bit you will see this:
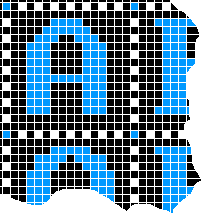
You should always try to keep at least one of the outer (left, right or both) columns of pixels blank to provide spacing between the characters. It is also good to leave one or more blank rows of pixels on the top or bottom (or both) to provide vertical spacing. As you can see in the above picture I hade both the upper row and left column free so this was a nice place to put my guide-dots. The black (and the white) squares represents the background, while all the blue squares (exept the one in the upper left of each character) are the ones we really want.
If you have the picture of the font you want, all dotted and nice, you are ready for the next step.
The birth of a font...
You will have to make a new text file in your favourite text-editor. When you save it you should give it the .c extension (i.e. my_wonderful_new_font.c).
You should save it in the same folder as the library. Remember to delete or rename the font-file you are going to replace.
The next part is optional, but I highly recommend that you make a few comments to describe your font. My comments for the big font could be:
// BigFont.c (C)2010 by Henning Karlsen
// Font Size	: 16x16
// Memory usage	: 3044 bytes
// # characters	: 95
If you are making a fontfile for the Arduino you must include a reference to the pgmspace.h header-file. This is needed because we will need to use the PROGMEM modifier when declaring our array.
#include <avr/pgmspace.h>
Now it is time to declare our array that will store our font. For the Arduino you must create an array of const uint8_t and store it in PROGMEM. If the fontfile is for a chipKit board you must create an array of const unsigned char.
Examples:
Arduino:  const uint8_t BigFont[3044] PROGMEM={
          const uint8_t SmallFont[1144] PROGMEM={
chipKit:  const unsigned char BigFont[3044]={
          const unsigned char SmallFont[1144]={
The size of the array can be calulated with the following formula:.
Size = (((Width / 8) * Height) * <number of characters>) + 4
For the large font that would be:.
Size = (((16 / 8) * 16) * 95) + 4
       ((2 * 16) * 95) + 4
       (32 * 95) + 4
       3040 + 4 = 3044
I would recommend that you dont use the names of the provided fonts (BigFont, SmallFont and SevenSegNumFont) for your own fonts. If you use any of those names you will have conflicts when trying to compile your sketch.
The shape of things to come...
The first things you have to put into your array is a few bytes to describe your font.
First you need to let the library know the size of your characters by entering the width (in pixels) and then the height. For the large font those numbers would be 0x10 and 0x10 as the both the width and height are 16 pixels. For the small font those numbers would be 0x08 and 0x0C (8x12 pixels).
Next you must let the library know where in the ASCII table your font starts. For a full font that would be the character 'SPACE' which is ASCII code 32 (= 0x20).
Finally you must tell the library how many characters it can expect to find in your font. For a full font that should be 95 (= 0x5F), and for a numeric font 10 (= 0x0A).
If we put these together we get
0x10, 0x10, 0x20, 0x5F,
for the large font, or
0x08, 0x0C, 0x20, 0x5F,
for the small font.
If you still haven't given up it is time to clear your head. The hard part is up next.
Reaching maturity...
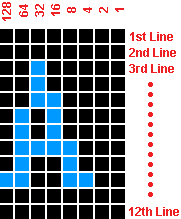
Now it time to start converting those lovely pixels into lots and lots of boring numbers. I will show you how to convert the letter A into font-data, but you should always start with a space if you are making a full font, or with the first character in your chosen subset, and follow the order presented earlier.

Guide-dots have been removed for clarity
If you are not up to scratch on the binary and hexadecimal numbers yet, you should really do something about it right now.
The order the bytes are stored for the large font are first the high-byte, then the low-byte for each line going from line 1 through to line 16.
If we convert the black and blue squares into 0's and 1's we get the following:
0 0 0 0 0 0 0 0 0 0 0 0 0 0 0 0
0 0 0 0 0 0 0 0 0 0 0 0 0 0 0 0
0 0 0 0 0 0 1 1 1 1 0 0 0 0 0 0
0 0 0 0 0 1 1 1 1 1 1 0 0 0 0 0
0 0 0 0 1 1 1 0 0 1 1 1 0 0 0 0
0 0 0 1 1 1 0 0 0 0 1 1 1 0 0 0
0 0 0 1 1 1 0 0 0 0 1 1 1 0 0 0
0 0 0 1 1 1 0 0 0 0 1 1 1 0 0 0
0 0 0 1 1 1 0 0 0 0 1 1 1 0 0 0
0 0 0 1 1 1 1 1 1 1 1 1 1 0 0 0
0 0 0 1 1 1 0 0 0 0 1 1 1 0 0 0
0 0 0 1 1 1 0 0 0 0 1 1 1 0 0 0
0 0 0 1 1 1 0 0 0 0 1 1 1 0 0 0
0 0 0 1 1 1 0 0 0 0 1 1 1 0 0 0
0 0 0 0 0 0 0 0 0 0 0 0 0 0 0 0
0 0 0 0 0 0 0 0 0 0 0 0 0 0 0 0
These looks like binary numbers! In fact the are...
If we compact everything into bytes we could put the following into our font-table:
B00000000,B00000000,B00000000,B00000000,B00000011,B11000000,B00000111,B11100000,
B00001110,B01110000,B00011100,B00111000,B00011100,B00111000,B00011100,B00111000,
B00011100,B00111000,B00011111,B11111000,B00011100,B00111000,B00011100,B00111000,
B00011100,B00111000,B00011100,B00111000,B00000000,B00000000,B00000000,B00000000,
This would work, but the result would be a very big file. There is nothing wrong with that, but it is unnecessary. It would be much better to convert all these 0's and 1's into hexadecimal numbers.
If we do this we end up with:
0x00,0x00,0x00,0x00,0x03,0xC0,0x07,0xE0,0x0E,0x70,0x1C,0x38,0x1C,0x38,0x1C,0x38,
0x1C,0x38,0x1F,0xF8,0x1C,0x38,0x1C,0x38,0x1C,0x38,0x1C,0x38,0x00,0x00,0x00,0x00,
In your font-file you should put all data for one character on a single line. This makes the code easier to read later. Remember that you need a comma at the end of each line, except on the last line (the one representing the tilde ~ in the full font) where it is optional.
I would also recommend that you put a comment at the end of each line to show which character the data represents. It is kinda hard to visualize a letter or symbol from all those numbers.
After you have converted all the pixels from your shiny picture into heaps of numbers for all your characters you are nearly finished.
All you need is to close the array definition by putting the following on the last line:
};
Your new large font is ready to use!
Reaching maturity a little quicker...
If you want to make a smaller font you should do exactly the same as described above, but there will be less numbers to convert.
The small font is only 8 pixels wide so you should end up with one byte for each line, again starting on line 1 and going down to line 12.
If you convert these pixels into hexadecimal numbers you should get:
0x00,0x00,0x20,0x20,0x30,0x50,0x50,0x78,0x48,0xCC,0x00,0x00, // A
Remember to close the array when you are done converting.
End Of Line...
If you have made a new font, and would like to share it with the rest of the world, just send me a message and I will put it on this site for all to download.
Game Over.
|
